Importing Custom Data and Using it in GeoBase |
Learn more about Verizon Connect GeoBase.
Get information about the latest release
This tutorial covers the process of importing a small set of custom data from a shapefile, creating a map style for it in Verizon Connect GeoBase WorkBench, and using the data in GeoBase.
Alchemy uses an SQL-like syntax and this tutorial assumes familiarity with SQL. |
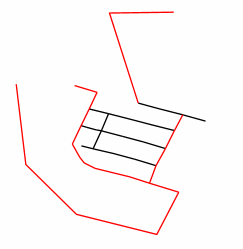
The source data that we will be using in our example is a small section of highways (red) and streets (black):

The DBF file that accompanies the SHP file lists the following in the StreetNames column:
| StreetName |
|---|
| Craig St |
| H-44 |
| H-83 |
| I-505 |
| I-808 |
| Main Rd |
| Mush Room Rd |
| Stewie Griffin Rd |
| Telogis Rd |
A shortcut to the files needed for this exercise can be found in the install folder by following the link in the examples folder to 'GeoBase Examples'. Open the Alchemy\Rome folder. You will need 3 files: CustomData.dbf, CustomData.shp, CustomData.shx. |
The goal of the import is to filter streets and highways from the StreetNames column into their own tables. The query script to achieve this reads as follows:
OUTPUT CustomData ;
DATASET "Custom Data Import Example" ;
COPYRIGHT "(c) __YEAR__ Verizon Connect" ;

SELECT Dress(SUBSTRING(%StreetName, 2)) as Name, STARTSWITH(%StreetName, "I-") ? "Interstate" : "Highway" AS Type
  INTO ImportHighways
  FROM "c:\CustomDataTutorial\CustomData"
  WHERE STARTSWITH(%StreetName, "I-") OR STARTSWITH(%StreetName, "H-");

SELECT Dress(%StreetName) as Name
  INTO ImportRoads
  FROM "c:\CustomDataTutorial\CustomData"
  WHERE ENDSWITH(%StreetName, " ST") OR ENDSWITH(%StreetName, "RD");
The script can be logically divided into two blocks, each of which contains a SELECT statement that populates a table.
SELECT Dress(SUBSTRING(%StreetName, 2)) as Name, STARTSWITH(%StreetName, "I-") ? "Interstate" : "Highway" AS Type
  INTO ImportHighways
  FROM "c:\CustomDataTutorial\CustomData"
  WHERE STARTSWITH(%StreetName, "I-") OR STARTSWITH(%StreetName, "H-");
The above block populates a new table called ImportHighways with streets that start with 'I-' or 'H-'. Note the following:
- Dress(SUBSTRING(%StreetName, 2)) - Pretty-formats the result of the string.substring of StreetName. This means that the first 2 characters are removed from StreetName, and the result is formatted before being selected into the Name column.
- "Interstate" : "Highway" AS Type - The result of either outcome of the ternary condition is selected into the Type column of the new table. It is not possible for the true and false outcomes to select into different columns.
- FROM "c:\CustomDataTutorial\CustomData" - Alchemy automatically appends .dbf and .shp to this path.
The second block selects streets with names that end with " ST" or " RD" into a table named ImportRoads. As in the previous block, the dress function is used to nicely format the name.
Provided that you have saved your import query with a .alchemy extension, you can run it by double-clicking on the query file. If the import has completed successfully, you will have a .gbfs file in the location specified by the OUTPUT parameter. In the case of our example build, the file CustomData.gbfs is created in the same directory as our import query file.
Alchemy will let you know if errors occur during the import. If you are in doubt as to whether the output file is valid, you can use GBFS Tool to check it.
You can verify your GBFS file by using GBFS Tool, which resides in \tools\GBFSTool in your GeoBase install path. GBFS Tool verifies your GBFS files, and also can tell you the version number of your file. |
When you have a valid output file, you need to put it where GeoBase can find it.
In order to render custom data sets in GeoBase, you must create a Map Style for it. Open WorkBench, and paste in the following code:
begin map
  clear brush<(115,211,232)>

  begin polygons
    render [land],brush<(238,228,144)>
  end polygons

  begin custom lines [ImportHighways]
    render [all],pen<(200,0,0),1>
  end custom

  begin custom lines [ImportRoads]
    render [all],pen<(0,0,0), 1>
  end custom
end map
Notice the use of the custom tag. This allows you to specify the name of the custom tables ImportHighways and ImportRoads with which each render block is associated.
You can use WorkBench to preview your new map style - navigate to the following latitude and longitude: 41.8155, 12.5067. If you zoom in you should be able to see the custom rendered lines. Try changing the colors in WorkBench, and notice how they are updated immediately in the map.
Save your map style, remembering the name and path that you saved it to - we will need this when creating the MapStyle object.
Having associated the Chameleon script file with the custom GBFS file, all that remains is to have GeoBase render the data on a map. The following code creates a Map object, and sets its Style property to the MapStyle object we just created:
Map map = new Map();
MapStyle style = MapStyle.Create("c:\\custom.cam");
map.Style = style;