Installing a GeoBase Hotfix |
Learn more about Verizon Connect GeoBase.
Get information about the latest release
From time to time minor GeoBase updates will be issued between major releases. These updates are referred to as 'hotfixes', and are typically published to the Verizon Connect Spatial website, or supplied directly to individual customers to address specific problems or requirements.
Hotfixes are not typically released with an installation application (MSI) but rather as compressed .zip archives which must be extracted and their contents manually copied to an existing GeoBase installation location on your computer. The procedure for this task is detailed below.
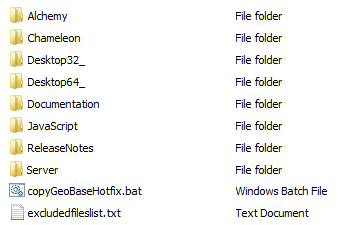
After you have downloaded and unzipped your hotfix archive file you will be presented with up to eight folders, a batch file and a text document: Alchemy, Chameleon, Desktop32_, Desktop64_, Documentation, JavaScript, Server, copyGeoBaseHotfix.bat, and excludedfileslist.txt.

The 'copyGeoBaseHotfix.bat' file may be used to automatically update your GeoBase version with all hotfix files. To perform an automated update, carry out the steps described below under 'Automated Update'. To perform a manual update, carry out the steps described below under 'Manual Update'.
| Fixes or updates to GeoStream server components may require changes to GeoStream's .config configuration files. Hotfix packages ship with default GeoStream configuration files which will include any new additions or changes required, but may not be suitable for your GeoStream environment. We recommend backing up your configuration files prior to installing a hotfix, and manually checking/merging the old and new files after installation to ensure that your settings are retained and new changes are included. See configuring the server for further information on these files. |
Automated Update
Open a DOS command prompt (Start | All Programs | Accessories | Command Prompt) and navigate to the unzipped hotfix folder's location (alternatively, hold the Shift key on your keyboard and right-click within the unzipped hotfix folder. Select the 'Open command window here' option from the contextual menu that opens).
To change the directory location use 'cd:' in the DOS console, for example cd: "C:\Program Files (x86)\Telogis\GeoBase" to change to a typical installation location. |
The 'copyGeoBaseHotfix.bat' batch file has the following syntax:
copyGeoBaseHotfix.bat Source Target [Copyconfig]
| Argument | Description | ||
|---|---|---|---|
| Source | The location of the unzipped hotfix folder | ||
| Target | The location of the GeoBase installation folder to be updated. | ||
| Copyconfig | Optional
A binary flag (0 or 1) to indicate whether existing GeoStream .config files should be replaced
by the default versions contained in the hotfix. If not specified, defaults to 0 (.config files will not be replaced).
|
Example:
C:\BatchFileLocation>copyGeoBaseHotfix.bat "C:\Hotfix" "C:\Program Files (x86)\Telogis\GeoBase" 0
When executed, the batch script will update the required files in the target GeoBase directories.
In the event of an error during the update process, a text format log file detailing the problem(s) encountered will be created in a new folder titled 'hotfix_logfile' within the target (GeoBase installation) folder. |
Manual Update
The files contained within the hotfix folders should be copied to your GeoBase installation folder, overwriting any existing file versions with their updated replacements.
For the purposes of this guide, we will call your installation folder [INSTALL]. Typically this folder is located at C:\Program Files(x86)\Telogis\GeoBase, but it may be found at a different location depending on your original installation configuration.
When copying these new files to your computer, choose the 'Overwrite' or 'Copy and Replace' option. |
To update your existing installation with this new hotfix:
Open the Desktop32_ folder. Copy all files within to the following folders:
[INSTALL]\bin
[INSTALL]\tools\Alchemy
[INSTALL]\tools\Chameleon
Open the Desktop64_ folder. Copy all files within to the following folders:
[INSTALL]\bin
[INSTALL]\tools\Alchemy
[INSTALL]\tools\Chameleon
Open the Documentation folder. Copy the 'Telogis GeoBase.CHM' file to your [INSTALL]\help folder.
Copy the Server folder, including all of its content, to the [INSTALL]\GeoStream folder.
 Caution
Before updating the GeoStream folder, ensure that you have backed up your GeoStream .config files and any customised versions of Verizon Connect provided scripts. These will need to be manually reconciled after updating. Open the Alchemy folder. Copy the file within to the [INSTALL]\tools\Alchemy folder.
Open the Chameleon folder. Copy the files within to the [INSTALL]\tools\chameleon folder.
The JavaScript folder contains only the 'telogis.geobase.js' file. This JavaScript file is also included in the Server folder (within the scripts subfolder). This folder does not typically need to be copied to your local computer. |
Congratulations, your GeoBase installation is now updated.
Hotfix Information
For information about changes included in your new hotfix update, see the Release Notes. The latest version of the release notes is available at http://docs.geobase.info/html/release_notes.htm.
Problems?
If you require additional assistance or support, don't hesitate to contact GeoBase support at gbsupport@verizonconnect.com. A member of the GeoBase Support Team will be glad to assist you.