Map Explorer |
Learn more about Verizon Connect GeoBase.
Get information about the latest release
Verizon Connect GeoBase Map Explorer is a simple GeoBase Map Control application that allows you to get a feel for the functionality provided by GeoBase. Map Explorer can be a starting point for your own applications, a test bench for ideas or just a learning tool. You are free to use this code any way you like.
Main map
Occupying the majority of the window, the main map is capable of panning and zooming to any location displayed in the mini-map. Click and drag to draw a rectangle and the map will zoom to contain the selected area.
When the mouse pointer is at the edge of the map the cursor becomes an arrow, indicating that a mouse click will pan the map in that direction. Additionally, when a search is entered in the location search bar, the main map will zoom and center on the resulting location.
Mini-Map
The smaller map displayed in the top-left corner is the mini-map. It shows a zoomed-out "birds-eye view" of the area available for view in the main map, to make navigation easier.
Clicking on a point in the mini-map causes the main map to center on that area.
 Tip
TipUse the mini-map to quickly find the general area you are looking for. - Zoom control
The zoom control allows for easy zooming of the main map. The zoom-control is a slider-bar positioned above the main map. When zoomed all the way out, the map will display the whole world.
Use your mouse scroll wheel to quickly zoom in and out.
Location search bar
Positioned in the top-left corner, this is a text field that geocodes street addresses and displays them on the main map. A search can be initiated by pressing the enter key or clicking the binocular icon.
NoteTry entering some street addresses in the search bar. Entering "20 Enterprise, Aliso Viejo" will find the Verizon Connect office.
- Directions table
Below the main map is the directions table. When a route has been created on the map, directions to the stops on that route are displayed in the directions table. Stops are color coded blue.
Geocoding
Map Explorer demonstrates geocoding by allowing users to enter street addresses into a location bar. The addresses are geocoded and automatically displayed on the main map.
NoteGeocoding refers to the process of turning a street address into latitude and longitude co-ordinates. As the name suggests, reverse geocoding is the opposite of forward geocoding and is the process of converting latitude and longitude co-ordinates into street addresses.
These two capabilities lie at the heart of the GeoBase system, allowing user input to be converted into real-world location information - and vice versa.
Routing
By right-clicking on the main map users are able to define route stops on the main map. Additional right-clicking allows the route to be optimized and driving directions.
GeoFences
By right-clicking on the main map users can define the perimeters of polygonal areas of exclusion, where routes cannot go.
Reachable areas
Reachable areas are the locations on the map reachable from a single point by travelling by a specified amount of time or distance. You can display reachable areas on the map by right clicking on the point and choosing to display reachable areas.
You can use Map Explorer to see how GeoBase's natural language recognition makes it easy to perform geocode queries. The GeoCoder will try many methods to match an address, thus it is possible that more than one match may be returned. If this is the case a list of possibilities will be presented.
In GeoBase a route is made up of a number of stops. Every route has a start and end, and may have a number of stops in-between. The routing feature finds a path from the start to the end, through any intervening stops.
GeoBase can give natural language directions to follow any given route, and is also capable of optimizing routes with priorities defined by custom routing strategies.
Using Map Explorer it is possible to create a new route, optimize the order of stops on the route and get driving directions for the route.
Adding Stops
To add a stop, right-click at the desired location and a pop-up menu will appear. Choose the Route option and select whether to add this stop as the start or end point, or as an in-between stop.
| Use the keyboard shortcut s to add a stop under the current mouse position. |
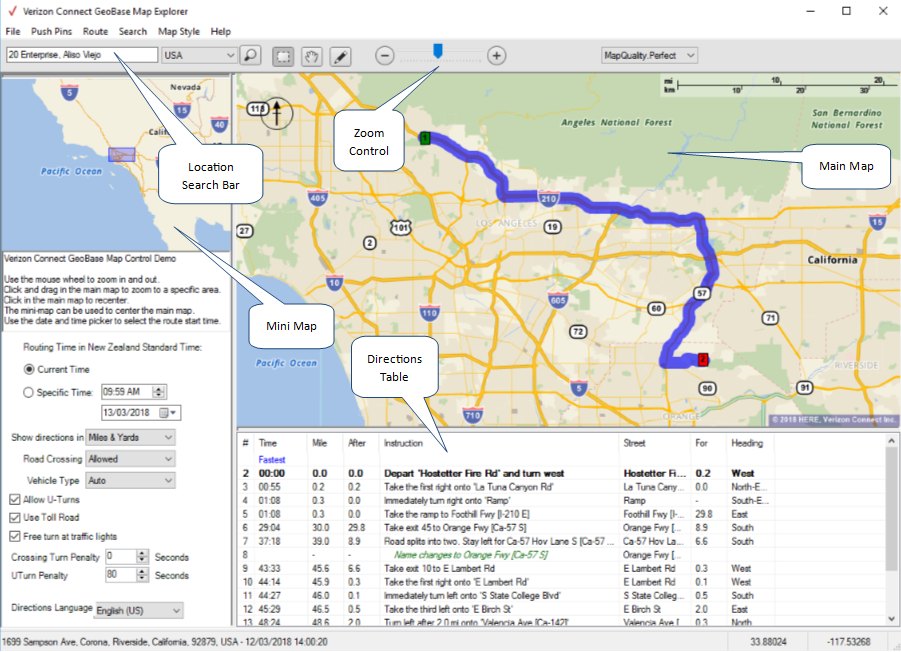
Changing a stop's heading
You can set the heading for each stop by right-clicking above the stop, and selecting Set Stop Heading from the context menu. Hover the mouse over the stop, and a handle will become visible (see figure below). Move the mouse over the handle, and while simultaneously pressing your keyboard's 'Ctrl' key, rotate the stop's heading to a suitable position. Release the 'Ctrl' key to set the heading.
Getting Directions
To get directions for a route, right-click on the map and choose Get Directions. This command invokes the GeoBase routing engine and returns driving directions to the Directions table in Map Explorer.
The 'Get Directions' command does not utilize the full capabilities of the GeoBase routing engine. The routing engine can also be configured to:
|
Route Optimization
In most routes there are many different ways to get to the same places. GeoBase can analyze these various possible paths and generate an optimum route. It is also capable of employing routing strategies that specify priorities for an optimum route. For example, it is possible to generate a route which covers the shortest possible distance.
To get an optimized route in Map Explorer, right-click on the map and select Route & Optimize Stops.
Optimized routes keep their original start and end points, but intermediate stops may be re-ordered to achieve the goals of the routing strategy. In Map Explorer these may be viewed by selecting Shortest or Fastest from the Route menu in the toolbar.
Route Highlighting
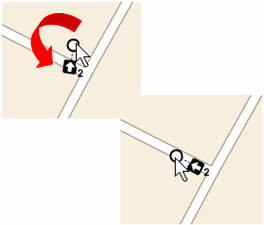
Route Highlighting is used to display the most likely route taken based on a series of RouteStops. This is useful when only the route stops are known, and the actual route taken is not known.
In the image below, three known stops have been placed on the map. To get an idea of the possible route taken, right-click on the map, and select Route, and then Get Route Highlight. The route's path will then be displayed on the map.
Saving & Loading Routes
Routes may be saved in an XML format using the Save and Load options in the Route menu. Saved routes can be loaded by dragging them from Windows Explorer and dropping them on the map window.
You can use Map Explorer to see how GeoFences can be used to define areas of exclusion and then examine their effect on routing. You can define a GeoFence by adding points to its perimeter one by one. Every time you add a point, the resulting GeoFence is drawn on the map. When a GeoFence is displayed on the map, calculating routes causes them to avoid entering the defined area.
Reachable areas are regions that you can drive or walk to within a given limit. There are two types of reachable areas:
- Concave areas are fitted to only the locations you can reach and anything closer.
- Convex areas are defined by drawing lines between the farthest points you can reach.
Map explorer lets you create both concave and convex reachable areas using a variety of criteria for the limit. Just right click on the starting point and choose Reachable Area | Calculate From Here. A dialog appears to let you specify the routing strategy to use for plotting the route to any point in the reachable area, and the maximum limit that can be travelled using that routing strategy.