Using a Dock Widget |
Learn more about Verizon Connect GeoBase.
Get information about the latest release
This tutorial demonstrates how to use a Dock widget to neatly group other widgets along one side of a Map object.
See the Full Code section for a full code listing which you can copy and paste into your project. |
Skeleton Code
The skeleton code for this tutorial is essentially the same as that of the Simple Map tutorial. However, note the following changes:
The skin.dock.translucentblack.js and skin.scale.translucentblack.horizontal.js JavaScript files are included
An HTML division is created with a black border. The map will be placed in this division
<%@ Page Language="C#" Src="AuthenticatedPage.aspx.cs" Inherits="AuthenticatedPage" %>

  <html xmlns="http://www.w3.org/1999/xhtml">
    <head>
    <title>Docking Demo</title>

    <script type="text/javascript" src="<% GetAPISource (); %>"></script>

    <script type="text/javascript" src="skin.dock.translucentblack.js"></script>
    <script type="text/javascript" src="skin.scale.translucentblack.horizontal.js"></script>

    <script type="text/javascript">
      var main = function () {

        // JavaScript code goes here

      };
    </script>
    </head>
    <body onload="main ();">
      <div id="main_map" style="position: absolute; left: 10px; top: 10px; border: 1px solid black;"></div>
    </body>
  </html>
JavaScript Code
To create the DockSkin JavaScript file, follow the instructions listed in the DockSkin JavaScript Code section. |
Place the following code inside the main() function above.
This code performs the following actions:
defines the objects and classes that we will use in this tutorial
sets the GeoStream server and authentication tokens
creates a new Map, placed in the main_map HTML division
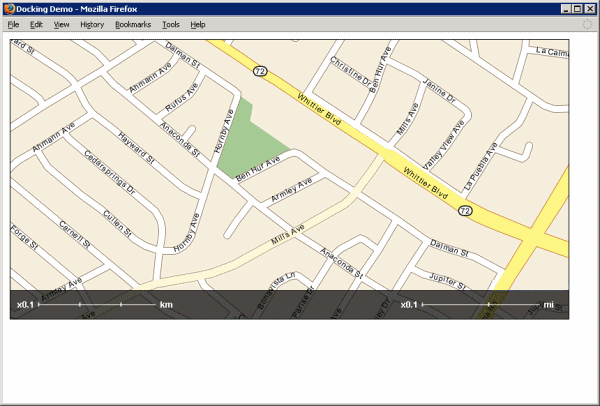
creates a new Dock with two Scales: one showing miles, the other kilometers
var DistanceUnit = Telogis.GeoBase.DistanceUnit;
var Dock         = Telogis.GeoBase.Widgets.Dock;
var GeoBase      = Telogis.GeoBase;
var Map          = Telogis.GeoBase.Widgets.Map;
var Scale        = Telogis.GeoBase.Widgets.Scale;
var Size         = Telogis.GeoBase.Size;

GeoBase.setService (<% GetService (); %>);
GeoBase.setAuthToken (<% GetToken (); %>);

var map = new Map ({id: "main_map", size: new Size(800,400)});

new Dock ({
  align: "bottom",
  map: map,
  items: [
    new Scale  ({unit: DistanceUnit.KILOMETERS}),
    new Scale  ({unit: DistanceUnit.MILES})
  ]
});
Testing
Load the newly created page in a web browser and you should see something similar to the following:

Don't see a map? Refer to Troubleshooting a GeoStream Server |
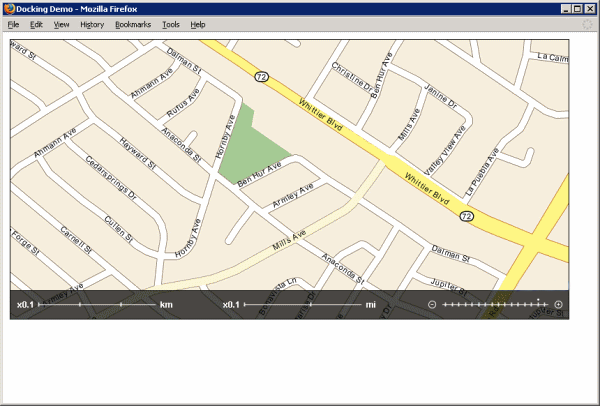
It's a simple matter to add more widgets to the Dock. In this section we will add a Slider to the Dock. This Slider will control the zoom level of the Map.
First, include the appropriate JavaScript file. Place the following line of code inside your head tags.
<script type="text/javascript" src="skin.slider.translucentblack.horizontal.js"></script>
See the Using a Slider Widget tutorial for the skin.slider.translucentblack.horizontal.js code. |
Next, add a reference to the Slider class inside your JavaScript main function:
var Slider = Telogis.GeoBase.Widgets.Slider;Finally, modify the Dock initialization code to include a new Slider:
new Dock ({
  align: "bottom",
  map: map,
  items: [
    new Scale  ({unit: DistanceUnit.KILOMETERS}),
    new Scale  ({unit: DistanceUnit.MILES}),
    new Slider ()
  ]
});
Load the newly created page in a web browser and you should see something similar to the following:

Don't see a map? Refer to Troubleshooting a GeoStream Server |
You may rearrange the widgets in the Dock by modifying the order of the items array, passed in the Dock's constructor.
Page Code
<%@ Page Language="C#" Src="AuthenticatedPage.aspx.cs" Inherits="AuthenticatedPage" %>

  <html xmlns="http://www.w3.org/1999/xhtml">
    <head>
      <title>Docking Demo</title>

      <script type="text/javascript" src="<% GetAPISource (); %>"></script>

      <!-- As with individual MapControls, Docks can be themed by (very simple) skins, here
      included from separate modules. Typically, these should match the skins used for the widgets
      contained in the dock. -->

      <script type="text/javascript" src="skin.dock.translucentblack.js"></script>
      <script type="text/javascript" src="skin.scale.translucentblack.horizontal.js"></script>
      <script type="text/javascript">

      var main = function () {

        var DistanceUnit = Telogis.GeoBase.DistanceUnit;
        var Dock         = Telogis.GeoBase.Widgets.Dock;
        var GeoBase      = Telogis.GeoBase;
        var Map          = Telogis.GeoBase.Widgets.Map;
        var Scale        = Telogis.GeoBase.Widgets.Scale;
        var Slider       = Telogis.GeoBase.Widgets.Slider;
        var Size         = Telogis.GeoBase.Size;

        GeoBase.setService (<% GetService (); %>);
        GeoBase.setAuthToken (<% GetToken (); %>);

        var map = new Map ({id: "main_map", size: new Size(800,400)});

        // a Dock can be used to group map controls together and display them neatly to one
        // side of a Map. Note that since it is assumed all controls in a dock will refer
        // to the Map that the Dock is on, the "map" configuration property of the controls
        // need not be specified (provided that the one for the Dock constructor *is*).

        new Dock ({
          align: "bottom",
          map: map,
          items: [
            new Scale  ({unit: DistanceUnit.KILOMETERS}),
            new Scale  ({unit: DistanceUnit.MILES})
          ]
        });
      };

      </script>
    </head>
    <body onload="main ();">
      <div id="main_map" style="position: absolute; left: 10px; top: 10px; border: 1px solid black;"></div>
    </body>
  </html>
DockSkin JavaScript Code
Paste the following into a new file, skin.dock.translucentblack.js, in the same directory as you created the above web page.
(function () {
  var DockSkin = Telogis.GeoBase.Widgets.DockSkin;
  DockSkin.standard = (DockSkin.translucentBlack = new DockSkin ({
    background: "images/skins/dock/translucentblack.png"
  }));
}) ();
Note that the DockSkin definition is suitable for both horizontal and vertical dock layouts. The orientation of the dock is only important to the Dock constructor, defined in the align tag. |
Images
Create the images/skins/dock directory hierarchy, beginning in the same directory as the web page. In this directory, place the following image:
 |
| translucentblack.png |