Rendering Your Own Tiles |
Learn more about Verizon Connect GeoBase.
Get information about the latest release
This tutorial will demonstrate how to use a GeoStreamRenderer to generate a custom tile layer, and how to then access that layer from a simple GeoStream map application. More specifically, you will create a GeoStream renderer that generates tiles showing reachable areas, and a JavaScript client that uses this renderer to fetch overlays showing the area reachable within ten minutes of the map center.
Writing and using GeoStream renderers lets you leverage skills developed working with other features of GeoBase and GeoStream:
- When implementing a GeoStream renderer, you override the abstract GeoStreamRenderer class, providing code that is similar to what you write when creating a custom renderer when using local GBFS data.
- When writing your JavaScript client, you access the tiles your GeoStream renderer produces the same way you access other GeoStream layers, using the Telogis.GeoBase.MapLayers.TileLayer class.
Before we can write a JavaScript application to access a custom tile layer, we must first write the GeoStream renderer to generate that tile layer. The renderer is an override of the abstract GeoStreamRenderer class, which is added to an aspx file. We will write this renderer in C#.
Because the renderer code is added to an aspx file, you do not need to compile it yourself: it is possible to simply use a text editor to generate the .cs file. However, if you generate the file using Visual Studio, you can take advantage of the syntax checking and intellisense that the development environment provides. You may also find it helpful to set the Debug attribute to true in the GeoStream server web.config file, so that you can debug your code by attaching to the process for your renderer. |
Setting up
Open Visual Studio and create a new empty Web Application. Add a reference to geobase.net.dll. Then, right click on the project and choose Add | Class. Name the new class RARenderer.
At the top of the .cs file, add the following using directives below the using System directive that is added automatically:
using System.Drawing;
using Telogis.GeoBase;
using Telogis.GeoBase.Routing.ReachableArea;
using Telogis.GeoBase.GeoFence;
using Telogis.GeoBase.GeoStream.Server;
Edit the class declaration so that your class descends from GeoStreamRenderer.
partial class RARenderer: GeoStreamRenderer {
}
Rendering the tiles
To render the tiles in our custom tile layer, we must implement a Render method. Add the following method to calculate a reachable area and draw it on the custom tile layer:
   // The Render method draws the tiles in our custom tile layer
   public override void Render(Graphics graphics, RenderContext rc) {

    // Polygon Fences are drawn in the Prelabelling render mode
    // because there are no modes on the server, set the mode here.
    rc.Mode = RenderMode.PreLabelling;

    // We will be drawing a reachable area.
    ReachableArea ra = ReachableArea.WithinTimeSpan(
        new LatLon(Request.Params["location"]), // read location from request
        new TimeSpan(0, 10, 0),                 // look for area reachable in 10 minutes
        new Telogis.GeoBase.Routing.RoutingStrategyFastest());

    // read the type of polygon to draw from the request
    switch (Request.Params["type"]) {
        case "convex":
            PolygonFence convex = ra.ComputeConvexPolygon();
             convex.RenderBrush = new System.Drawing.SolidBrush(Color.FromArgb(80, Color.Blue));
             convex.RenderPen = new System.Drawing.Pen(Color.Blue, 1);
             // use the render method of the reachable area to draw the tiles.
             convex.Render(graphics, rc);
             break;
        case "concave":
            PolygonFence concave = ra.ComputeConcavePolygon();
             concave.RenderBrush = new System.Drawing.SolidBrush(Color.FromArgb(80, Color.Green));
             concave.RenderPen = new System.Drawing.Pen(Color.Green, 1);
             // use the render method of the reachable area to draw the tiles.
             concave.Render(graphics, rc);
             break;
        default:
             throw new Exception("Unexpected Type");
    }
}
Note that the render method reads two arguments from the incoming request, location and type. These must be supplied by the JavaScript application that makes use of the custom tile layer.
| When creating a GeoStream renderer, you can design it to use any parameter names that are not reserved by the GeoStream tile server. The parameter names that are reserved by the GeoStream tile server are: "t", "a", "d", "s", "auth_geostream", "data", "satellite", "layer", and "auxlayer". |
Managing the caching of tiles
All GeoStream renderers must override the ExpiresAfter property, which indicates how long our custom tiles can remain in the cache. We will allow our tiles to last for 10 minutes. Add the following property to your class:
public override TimeSpan ExpiresAfter {
    get {
        return TimeSpan.FromMinutes(10);
    }
}
Because our renderer relies on arguments supplied by the JavaScript application, we must also provide a cacheIdvalue that marks cached tiles with the arguments used to generate them. Add the following property to your class:
public override string CacheId {
    get {
        return Request.Params["location"] + Request.Params["type"];
    }
}
Deploying the renderer
Save the .cs file for the RARenderer class as RARenderer.aspx.cs. Place this file in the C:\Program Files\Telogis\GeoBase\GeoStream\server\renderers folder. (If the renderers folder does not exist in your GeoBase installation, you can create it.) Using a text editor, create another file in the same folder, called RARenderer.aspx. This second file should contain the following:
<%@ Page Language='C#' Async='true' AutoEventWireup='true' CodeFile='RARenderer.aspx.cs' Inherits='RARenderer' %>
That's it. There is no need to edit any config files. By placing your renderer in the renderers folder, the GeoStream server automatically knows how to find your custom tile layer.
Now that we have a GeoStream renderer, we are ready to create a simple application to display our custom tile layer.
Generating the skeleton code
To begin with, create a new text file, and save it to your Scripts folder in your GeoStream server as rendererlayer.aspx. As with other tutorials, start with the following skeleton code:
<%@ Page Language="C#" Src="AuthenticatedPage.aspx.cs" Inherits="AuthenticatedPage" %>
<!DOCTYPE html PUBLIC "-//W3C//DTD XHTML 1.0 Strict//EN" "http://www.w3.org/TR/xhtml1/DTD/xhtml1-strict.dtd">

<html xmlns="http://www.w3.org/1999/xhtml">
    <head>
        <title>GeoStream Renderer Layer Demo</title>

        <script type="text/javascript" src="<% GetAPISource (); %>"></script>
        <script type="text/javascript">

            var main = function () {


            };

        </script>
    </head>
    <body onload="main ();">

    </body>
</html>
Inside the second script block, Add code to generate a map:
 var map;

 var main = function () {

   var GeoBase = Telogis.GeoBase;
   var Map = GeoBase.Widgets.Map;
   var LatLon = Telogis.GeoBase.LatLon;

   GeoBase.setService (<% GetService (); %>);
   GeoBase.setAuthToken (<% GetToken (); %>);
   map = new Map ({id: 'main_map', center: new LatLon( 34, -118.25)});

};
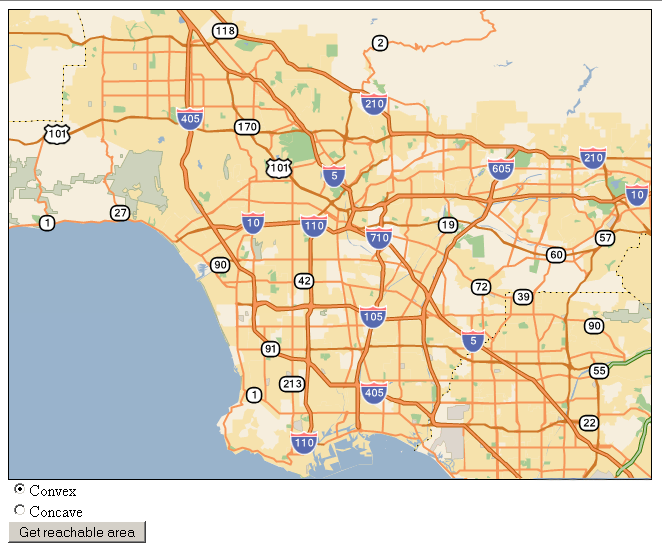
At this point, if you test your application by opening http://localhost/GeoStream/scripts/rendererlayer.aspx in a browser, you should see your map, centered on Los Angelos.
Adding controls
Place the following code inside the <body> element. This will:
- Set the map in a div element on the page.
- Create radio buttons for specifying the type of reachable area you want to see.
- Create a button for requesting the tile layer with the reachable area.
<div id="main_map" style="border: 1px solid black; width: 640px; height: 480px;"></div>
<input id="convexradio" type="radio" name="type" value="convex" checked="checked">Convex</input><br />
<input id="concaveradio" type="radio" name="type" value="concave">Concave</input><br />
<input type="button" value="Get reachable area" /><br />
If you run the application at this point, you can see the controls below the map, although the button to fetch a reachable area is not yet wired up.
Fetching the reachable area overlay tiles
All that remains is to generate a tile layer supplied by the GeoStream renderer we created. Add the following to the JavaScript block:
var fetchOverlay = function() {
    if (this.tileLayer) {
        this.tileLayer.destroy();
    }
    // get a string for the location at the center of the map
    var location = map.getCenter();
    var locationstring = location.toString();
    // ToString returns a string of the form "(lat, lon)", so se need to remove the parentheses.
    locationstring = locationstring.substr(1, locationstring.length - 2);
    var convexradio = document.getElementById("convexradio");
    var type;
    if (convexradio.checked) {
       type = 'convex';
    }
    else {
       type='concave';
    }

    this.tileConfig = {
        serverPage: 'renderers/RARenderer.aspx',
        args: {
            location: locationstring,
            type: type
        }

    };
    var TileLayer = Telogis.GeoBase.MapLayers.TileLayer;
    this.tileLayer = new TileLayer ( {
        id: 'main_map_auxiliary',
        map: this.map,
        tileConfig: this.tileConfig
    });
};
This function clears any tile layer we have already displayed, sets up a tileConfig to indicate we want to use the RARenderer.aspx file, and supplies the arguments that the server is expecting. It then creates a new TileLayer object, associating it with the map on the page so that the overlay tiles fetched from the GeoStream renderer have the same zoom and tile size as the map tiles.
Finally, we need to hook the function that fetches tiles from our renderer so that it is called from the button on our page. Edit the button so that it reads:
<input type="button" value="Get reachable area" onclick="fetchOverlay()"/><br />
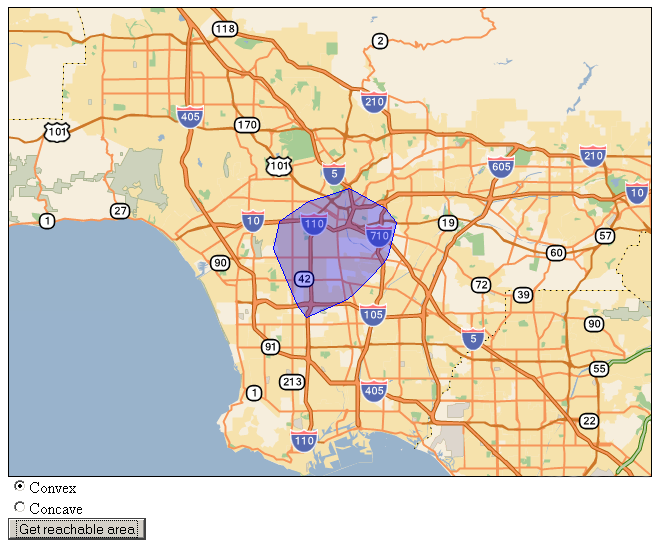
If you open your application in your browser, then click "Get Reachable Area", the polygon representing everything that can be reached from the map center in 10 minutes appears as an overlay on the map:
Full code
<%@ Page Language="C#" Src="AuthenticatedPage.aspx.cs" Inherits="AuthenticatedPage" %>
<!DOCTYPE html PUBLIC "-//W3C//DTD XHTML 1.0 Strict//EN" "http://www.w3.org/TR/xhtml1/DTD/xhtml1-strict.dtd">

<html xmlns="http://www.w3.org/1999/xhtml">
    <head>
        <title>GeoStream Renderer Layer Demo</title>

        <script type="text/javascript" src="<% GetAPISource (); %>"></script>
        <script type="text/javascript">

        var map;

        var main = function () {

          var GeoBase = Telogis.GeoBase;
          var Map = GeoBase.Widgets.Map;
          var LatLon = Telogis.GeoBase.LatLon;

          GeoBase.setService (<% GetService (); %>);
          GeoBase.setAuthToken (<% GetToken (); %>);
          map = new Map ({id: 'main_map', center: new LatLon( 34, -118.25)});
        };

     var fetchOverlay = function() {
      if (this.tileLayer) {
        this.tileLayer.destroy();
      }
        // get a string for the location at the center of the map
        var location = map.getCenter();
        var locationstring = location.toString();
        // ToString returns a string of the form "(lat, lon)", so se need to remove the parentheses.
        locationstring = locationstring.substr(1, locationstring.length - 2);
      var convexradio = document.getElementById("convexradio");
          var type;
        if (convexradio.checked) {
             type = 'convex';
        }
        else {
             type='concave';
        }

      this.tileConfig = {
        serverPage: 'renderers/RARenderer.aspx',
        args: {
          location: locationstring,
          type: type
        }

      };
      var TileLayer = Telogis.GeoBase.MapLayers.TileLayer;
      this.tileLayer = new TileLayer ( {
        id: 'main_map_auxiliary',
        map: this.map,
        tileConfig: this.tileConfig
      });
    };

        </script>
    </head>
    <body onload="main ();">
        <div id="main_map" style="border: 1px solid black; width: 640px; height: 480px;"></div>
        <input id="convexradio" type="radio" name="type" value="convex" checked="checked">Convex</input><br />
        <input id="concaveradio" type="radio" name="type" value="concave">Concave</input><br />
        <input type="button" value="Get reachable area" onclick="fetchOverlay()"/><br />

    </body>
</html>